
If your application uses Windows Security Integration, refer to implementation notes in the topic: Windows Security Integration
Use the Accounts dialog to create and manage all accounts and roles. Your account must have the Manager privilege. The following instructions are for creating an account, but apply identically to creating a role, excepting that roles do not have passwords, alternate identification or automatic sign off periods.
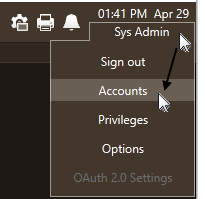
Reopen the Accounts Dialog (one of several ways)
Recommended practice is to assign privileges to roles, then assign roles to accounts.
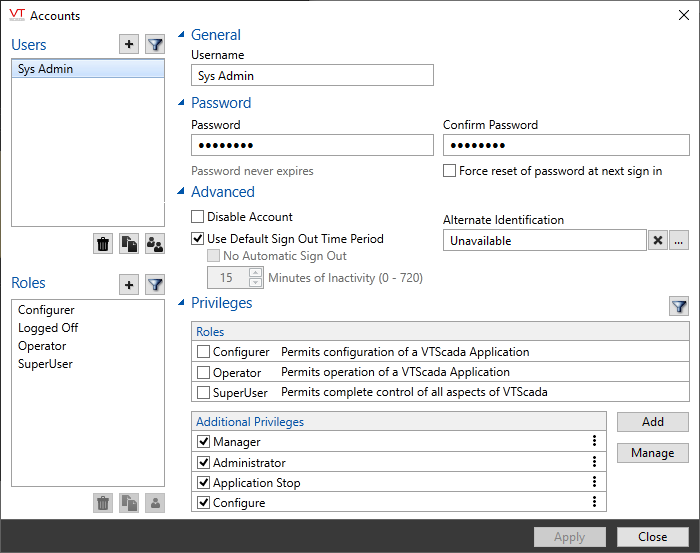
The Accounts dialog. To open for the first time, click Sign In and choose to activate security.
There are several ways to create an account or role.
- Create a new account or role
- Copy an existing account or role
- Copy a role to an account
- Copy an account to a role
If a manager is a member of a security realm
Managers who are members of a realm cannot see accounts or roles that are not also members of the same realm.
Use a manager account that is not a member of a realm when creating roles, unless you need roles that exist only for a specific realm.
If an asterisk is visible beside the name of an account or role, the changes have not been saved. Use care when closing the dialog.
Naming Rules for Accounts and Passwords
- Account names cannot begin or end with spaces.
- Do not use the following characters in VTScada account names:
" \ / [ ] : | < > + = ; , ? * @
- The following characters are not allowed in Windows account names: (spaces are accepted but not advised)
" / \ [ ] : ; | = , + * ? < >
Use care with special characters in account names and passwords. While valuable from a security standpoint, some characters may cause problems with certain Alarm Notification devices.
* As an example, it has been reported that many symbols other than letters and numbers in a password will not work with the Twilio® interface. To be safe, use only alpha-numeric symbols in account passwords.
- Right-click in the list of accounts and select "Add User" or click the Plus button above the list of accounts.
The same tools are found in the Roles section, immediately below the Accounts section.

Either technique works to create a new account or role.
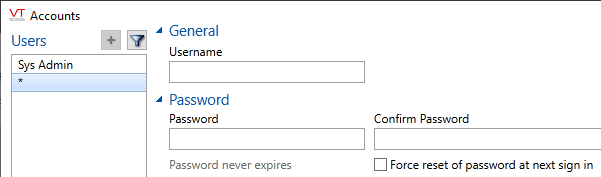
An asterisk appears, marking the place for the new account or role.
The asterisk is used to mark any account that has unsaved changes. You can switch between accounts to compare settings without losing changes made so far, and without losing track of which account has unsaved changes.
- Enter a name for the new user.
Similarly, enter a name if creating a new role.
- Enter and confirm a password.
Does not apply to roles.
You might wish to make this password a temporary, generic password and have the user change it when they first sign in. Users do not need the Account Modify privilege to change an expiring password, but they will need that privilege to change their password at other times.
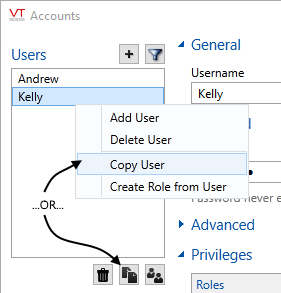
Copy an existing account or role:
Creates a clone of the account or role, differing only in name and (in the case of accounts) password. Useful when creating a series of similar accounts or roles.
- Click once to select the account to copy.
- Right-click to open the menu, then click "Copy User" or click the Copy button.
Again, the same applies if copying a role.
An asterisk will appear in the user list, marking a place for the new account or role.
- Enter a name for the new account or role.
- Enter and confirm a password.
Applies only to accounts.
The new account or role will have all the privileges and other settings of the old account or role.
For accounts only, if the original used Alternate Identification, you will need to create a unique password for the new account.
Creates a new account having all the privileges that belonged to the role. This is not recommended as it is far more efficient to create a new account using one of the preceding methods, then assign the role.
- Click once to select the role to copy.
- Right-click on the role to copy and from the menu, select "Create User From Role" or, select the role then click the Copy button at the bottom of the list.
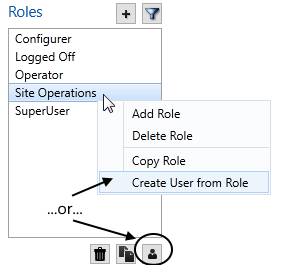
An asterisk will appear in the account list, marking the place where the new account is being added.
- Enter an Account Name for the new user.
- Enter and confirm a password.
Creates a new role, having all the privileges that belonged to the account. This is useful if you originally assigned privileges to the account and now wish to manage rights using roles instead.
- Click once to select the account to copy.
- Right-click on the account to copy and from the menu, select "Create Role From User" or, select the account then click the Copy button at the bottom of the list.
An asterisk will appear in the user list, marking the place where the new role is being added.
- Enter a name for the new role and apply changes.
Delete an account or role
Select the account or the role then click the trash can (delete) button below the list. Note that nothing is deleted until you press Apply. Deleted roles will remain visible in other parts of the dialog until the change is applied.
If you delete the last account that possesses the Manager privilege, your application will return to the unsecured state. You will be warned.
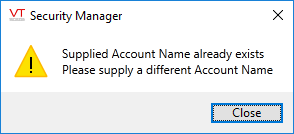
VTScada will not allow two accounts with the same name. The following warning dialog is displayed and the second account not saved.
Troubleshooting:
- Unable to open the Accounts dialog.
Your account does not include the privileges required to use this feature.
- The New and Copy features will not work
Your account does not include the privileges required to use these features.
- A "Discard Changes" dialog appears whenever I try to close the dialog.
Click Apply before trying to close the dialog
- Wrong name given to the account or role.
Click on the Name field, type a new name, then click, "Apply".
