
If user realms are in use, then the pen group you save will be available only to members of your security group.
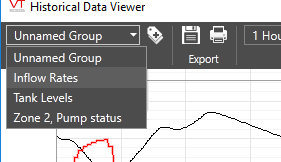
You can create named selection groups of tags to plot. These groups are available for all users in a drop-down menu at the upper-left corner of the Historical Data Viewer. The ability to work with pen groups is controlled by the security privileges Group Modify, Group Save and Group Delete.
Notes:
Saved groups are treated more like historical data than part of the application design. This means that they are not included in ChangeSets of the application.
For those using Realm Filtering, saved groups are tied to realms. Pen groups that you create while signed in within one security realm are available only to members of the same security realm.
When you click on a group name from the menu, a preselected set of tags will be plotted on the graph.
The same feature is used by the HDV Button Widget.

- Open the Tag Selector from the Historical Data Viewer
- [optional] Define filters to reduce the length of the tag selection list
- Select tags from the list or click Add Query to save the filter as a query.
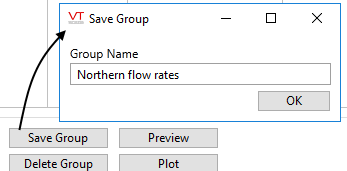
- Click the Save Group button.
The Save Group dialog will open.
- Enter a name for the new pen group in the Save Group field.
- Press the Enter key on your keyboard to input the new name.
- Click OK.
Troubleshooting:
- Unable to use a particular name
Group names may not be numeric and may not contain most punctuation characters. Select a new name.
- Group contains unwanted tags or is missing desired tags.
Groups can be edited. Add or remove tags are required, then save the group, using the current name.
Modify pen groups
After you have created a pen group, you can modify the tags belonging to it at any time.
- Expand the pen group drop-down list in the Historical Data Viewer page's tool bar (i.e. the drop-down list to the far left in the tool bar).
- Select the name of the pen group you wish to modify.
- Click the Tag Selector button.
The Tag Selector dialog will open, and the text Currently Editing <Pen Group Name> will appear in its title bar (where <Pen Group Name> is the name you configured for the selected pen group).
- Use the Select Tag and Remove Tag/Query buttons in the Tag Selector dialog to modify the Selected Tags list until it contains only the tags you wish to belong to the selected pen group.
- Click the Save Group button.
The Save Group dialog opens and displays the name of this pen group.
- Click OK to modify the referenced pen group.
- Click the Plot button to close the Tag Selector dialog and plot all pens belonging to the group on the graph on the Historical Data Viewer page.
Troubleshooting:
- Wrong group selected for editing.
The tag selector's title will state the name of the group being edited.
If changes have been made to the wrong group and you have Version Control as part of your VTScada license, you may reverse the change. Otherwise, edit the groups to restore the pen selection.
To delete an existing pen group, provided that your account has the required security privilege:
- Expand the pen group drop-down list in the Historical Data Viewer page's tool bar (i.e. the drop-down list to the far left in the tool bar).
- Select the name of the pen group you wish to delete.
- Click the Tag Selector button.
The Tag Selector dialog will open, and the text Currently Editing <Pen Group Name> will appear in its title bar (where <Pen Group Name> is the name you configured for the selected pen group).
- Click the Delete Group button.
The Delete Group? dialog will open and request confirmation that you wish to delete that pen group.
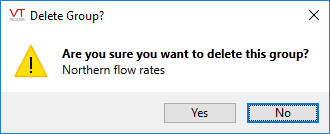
- Click the Yes button.
The tags belonging to the selected pen group will be removed from the Selected Tags/Queries for Plotting list in the Tag Selector dialog.
- Click the Close button.
The Tag Selector dialog will close, and the tags belonging to the deleted pen group will removed from the graph on the Historical Data Viewer page.
Transferring Pen Groups
The following describes an advanced procedure. It should be used only by experienced VTScada developers.
Pen groups are stored in files under the Data\NetworkValues folder structure. These are not under version control and are not included in ChangeSets.
The pen group files are named using the pattern HistoricalDataViewer-Group-Group+ followed by the name of the group and related information. There will also be a file named HistoricalDataViewer+HistoricalDataViewer-GroupList.NVX You can copy these to another workstation where the application is installed.
- On the source workstation, create a copy of the files that match the patterns noted, then take or send that copy to the destination workstation. (All remaining steps are done on the destination computer.)
- On the destination workstation, stop the application.
- Delete the file \Data\NetworkValues\NetworkValues.Cache.
- Paste files you copied from the source computer into the Data\NetworkValues folder of the destination computer.
- Restart the application.
If the destination workstation had pen groups that were not on the source workstation, they will be lost when you over-write the GroupList file. Use this procedure only when the application is newly installed from a ChangeSet.
