Add a New Tag or Child Tag

Adding a new tag by right-clicking
New tags are placed below the currently selected level of the tag tree. While you can always move a tag, it's easier to create it in the right place from the beginning.
There are two ways to create a tag in the Tag Browser: The first is to click the large button at the bottom of the window, labeled "New". The second is to add a new tag by right-clicking on the target level and selecting "New Child" from the menu that opens.
"Child tag" simply means "below the selected level". The point is that it has a parent in the Tag Browser. This gives benefits of organization, clarity in naming, ease of application scaling, and security management. Many tags are designed to link automatically to their nearest appropriate parent. For example, driver tags will link to the nearest port. I/O tags will link to the nearest parent driver.
The Select Type dialog will open every(*) time you add a new tag. The last four types that you created will be listed at the top, making it easy to create another of these types. Below those, tags are grouped according to their use. Tags that have extra features are marked. You can hover the pointer over a symbol to learn more:

Selecting a type
(*) If you had set the Tag Browser's type filter to a specific tag type, then the selection part is done. When you add a new tag, the properties dialog will open for a new instance of the type that matches the filter. If the filter is set to a group, then the Select type dialog opens to that group.
After you select a type, its properties dialog (example follows) will open. Every tag's properties dialog has an ID tab, similar to the following image, which will include Name, Area and Description at a minimum.
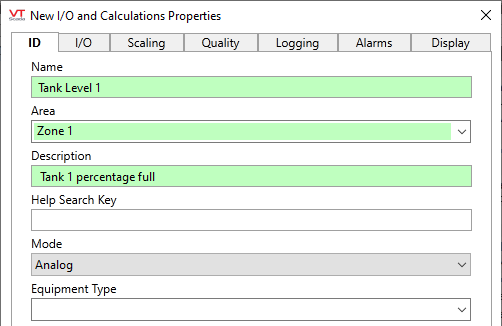
ID tab of the I/O tag's properties dialog. (Sometimes called a configuration folder.)
There are rules for tag
You're allowed to change the names of your tags, but if you have expressions or anything else that links to the old name, you will need to tell those to use the new name instead.
Fields turn green when you change the information within them. This helps you keep track of what you have changed and what you haven't touched. The green lasts only until you click OK. If you re-open the folder later, all fields will be white again until you start making new changes.
If you create a second tag of the same type, it will be pre-configured with the same values as the last except for the name, and those fields will be marked green so that you know which ones are not default values. This can save time, but be careful not to leave values that should have changed for the new tag. (There's a property to control that behavior: RememberNewTagParameters.
Fields can also turn other colors, depending on how they're configured.
Hover over a field to see a tool tip that tells you more about that field.
- Open the Tag Browser, using either the button at the top of the page, or from within the Idea Studio.
- Check the Address bar at the top of the Tag Browser.
Ensure that you are adding your tag where you want it to be within the hierarchy. New tags will be added to the selected parent tag. - Check whether a filter is in effect.
A filter in the tag browser won’t stop you from adding a new tag, but it may limit the type you can create or interfere with your ability to see that tag in the list after it has been added. A type filter will limit the list available in the Select Type dialog. This may be helpful or it may be a hindrance.
- Click New.
You will be prompted to select the type of tag that you want to create.
- Open the appropriate group and select the type.
A new tag properties folder will open.
- Configure the tag’s properties.
Notes for every type of tag are provided in the reference section of this documentation.
- Click OK.
The new tag will be referenced by its Name and Description in the Tag Browser’s tag list. A tag's full name includes the name of all it's parent tags, separated by backslashes. This can sometimes become too long to display in a field, in which case VTScada will abbreviate the displayed name. Hover the pointer over the field to see the full name, displayed within a tool tip.
If the Auto Deploy option is selected for the application, then this operation is complete. Otherwise, this will be considered to be a local edit until you deploy your changes.
