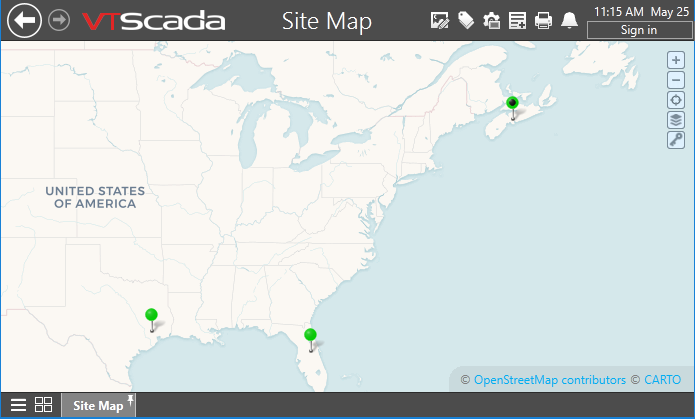
Site Map
A Site Map is a dynamically-loaded map, primarily used to show the location of any of the site-related tags: Polling drivers, DataFlow RTU drivers, MultiSmart™ stations, MPE™ Duplexer stations, or MPE™ SC stations. You can also link a Context tag (or a user-created type derived from a Context tag) to a map by adding the properties "Latitude" and "Longitude" to the parameter list. A Site Map is a standard part of the menu, and is built into every automatically-generated lift station details page and into the Site Details page. While you can add extra Site Maps to pages within your application using the Site Tools palette or the Menu, it is usually not necessary or beneficial to do so.
In addition to the Site Map page, maps are also an optional part of the Sites page and the Site details page. If viewed in a Sites page, you can choose to add a legend to the map. This is the Site Legend widget, which can be drawn on any of your application pages.
Use the controls at the upper right to zoom or to select the map style.
Set the location of a site:
To set the location of a site based on a Context tag, that tag must have Latitude and Longitude properties. See: Add Site Properties. in the description of the Context Tag.
While you could open a tag's configuration panel and type in Latitude and Longitude values, it is usually easier to click a location on the map. In order to do so, you must be viewing a single site using the Site Details page, or by drilling down to the site in the Sites page. When doing so, an Update Site Location button will be provided at the bottom left corner of the map.

The currently selected site is indicated by a pulsing beacon. This is useful when the Show All Sites option is enabled, allowing more than the currently selected site to be seen.
Display Control
Use the scroll wheel of your mouse or the plus and minus buttons at the upper right corner of the map to change the scale. For each magnification level, a new set of map tiles must be downloaded to your workstation. A reset button is provided below the scale, allowing you to return quickly to the original display.
You can set a default scale factor for each site tag in the Site Display tab of its configuration panel.

Sites:
Sites are displayed using markers, either the default pin or a shape of your own creation. Open the Site Map page for a specific tag to access the Update Location button to place or move the site.
Any of the following tags can be a site when configured to have Latitude and Longitude values, and to be shown on a map:
- Context tags and user-defined types based on Context tags, if they have site properties.
- Polling drivers.
- DataFlow RTU drivers.
- MultiSmart™ stations.
- MPE™ Duplexer stations.
- MPE™ SC stations.
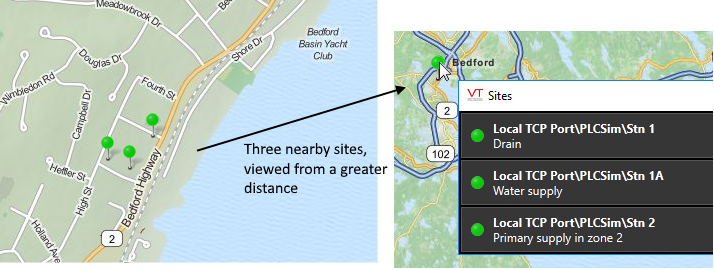
It is typical for sites to be near together. At a close scale, it is easy to tell one from another, but when viewing a larger area, only one pin can be seen.
If sites appear to overlap, a click on the pin icon will open a menu of sites near that location. Choose the site that you want to view in more detail.
The setting SitesPageIconLoadTime is the time interval VTScada waits to see if a particular site icon has finished loading on a map. The default is 0.1. If this is too short, the following symptoms may occur. On a map with many site icons, if any icons overlap, clicking on the overlapping area might cause both of the site pages to open in addition to a site selection dialog. Increasing this timeout to 1 second can alleviate this problem.
Connectors:
Connectors are displayed as a line or pipe between two Sites. The color and style of the connector is configurable, but not the width. Connectors are displayed only when two sites with latitude and longitude values have been selected, and when the connector is configured to be shown. Only Context tags or user defined types derived from a Context tag can be connectors. A connector will remain visible if you zoom in to a map tile between two sites.
Because a connector is based on a Context tag, it can have user-defined properties and child I/O tags.
Slippy Map
The map is sometimes referred to as a "slippy map" because of the way it can be moved within its frame. Operators can pan and zoom to change the area displayed.
The map display is built of "tiles" - static images. At each higher magnification level, four times the number of tiles are used for a given area. As the operator moves the display or changes magnification level, new tiles must be downloaded. After being downloaded, they will be cached locally on your computer. These tiles are not distributed with VTScada, therefore your server must have an active Internet connection to be able to download tiles that have not been cached.
It is possible to switch from map view to satellite view, or to a different map provider. See the task list at the end of this topic.
Any instance of the tag types listed above can be located on a Site Map as a pin. Operators can click on the pin to open the associated Site Details Page. Instructions for create your own pin shapes are provided elsewhere. Refer to the list of tasks at the end of this topic.
The primary site associated with a map will be marked by an animated bubble. The head of the standard marker pin uses the same color-indication system as the Site Draw Drawing Method and described by the Site Legend widget.
(c) OpenStreetMap Contributors © [CARTO]
The copyright notices at the bottom corner of every map are each click-able links, allowing you to learn more about the source of the tiles you are viewing.
Map tiles are downloaded only once and cached on your hard drive. In a networked application, they are downloaded only the primary server. All other servers and workstations copy from there. If you believe that newer images are available, delete the files from sub-folders of C:\VTScada\Data\SlippyMapTiles. New tiles will be downloaded the next time you view the map.
Available controls for the map include: (*)
| Control | Action |
|---|---|
| Show All Sites | A check box to enable or disable pin display for sites other than the root. |
| Update Site Location | After clicking this button, the next click within the map area will re-locate the site. |
| Magnification Control | (+) and (-) buttons. Provides a way to increase or decrease the magnification (zoom level) one step at a time. |
| Reset | A button below the magnification control slider. Resets the scale and location to the original view, as seen when the map was opened. |
| Map Selection |
Opens a list of maps configured in your Setup.INI file. |
| Legend Display | Toggles the display of a legend describing the colors in a site icon (pin) |
| Click on any pin | Opens the Site Details page for that tag, as appropriate for the type. |
| Click and drag | Relocate the focus of the map. |
| Mouse-wheel | Zoom in or out. |
| Double-click | Zoom in, one step, at the location clicked. |
(*) Some controls will not be available, depending on how the map is viewed.
Disable / Enable Maps
The VTScada installation wizard gives you an option of not using maps, but this refers only to Open Street maps. Carto® maps are always enabled.
To enable Open Street maps later, if you choose not to during installation, edit your Setup.INI file to change the value assigned to SlippyMapOSMDisable from 1 to 0, then restart VTScada.
To disable all maps, open your Setup.INI file and locate the [SlippyMapRemoteTileSourceN] sections (where N is a number from 1 to 4). Comment-out every property in each of the sections by adding a semicolon at the beginning of each line. DO NOT DELETE PROPERTIES. If you do, and then decide to re-enable maps, you will need to reinstall VTScada. Better to simply disable the properties by adding semicolons. Save the edited file and restart VTScada.
