Local versus Deployed Changes
The last deployed change becomes the official version of the application. In a networked application, deployed changes are distributed and applied to all the workstations running that application. If you send someone a ChangeSet of your application, they will receive the last deployed version and will not see your local changes.
Until a change is deployed, it is said to be "local". Local changes are stored in a separate branch of the application's version history. They do not become active on other workstations (although they can be viewed there). They can be erased using the Revert Changes tool. While there are local changes on a workstation, the title bar will display a "Work-in-progress" image.
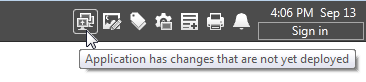
The undeployed changes indicator
All changes to an application are automatically and immediately deployed unless you configure it otherwise. In most cases, it is an advantage to have the Automatically Deploy Changes option selected because it ensures that your edits are always saved as the official version of the application in the repository. A situation where you might not want this feature is if you are making changes to a networked application and do not want your edits to be installed on the other workstations until you have finished and tested your work.
When auto-deploy is off, you must take extra care to deploy changes that need to be in effect on all servers.
To toggle the Auto-Deploy Setting:
- Open the Application Configuration dialog.
- Select the tab labeled "Other".
- Select or deselect the Automatically Deploy check box.
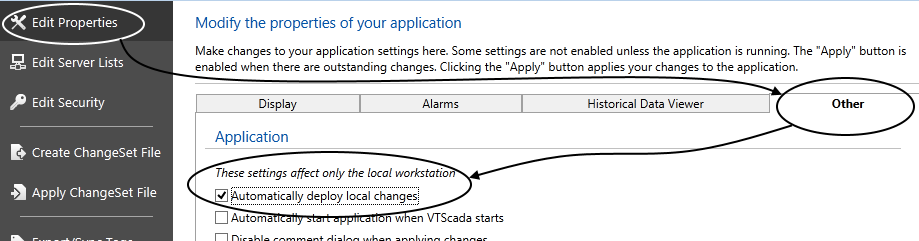
- Click Apply.
Changes related to security accounts are always deployed automatically and immediately.
* Auto-Deploy cannot be deactivated on a RunTime licensed workstation.
* Changes to the Automatically Deploy option affect only the current workstation. You cannot remotely change this value on other workstations.
Troubleshooting:
- Critical updates are not being distributed to other servers.
Use Deploy Changes or turn Auto Deploy back on.
The Deploy Changes page is disabled while the Automatically Deploy Changes feature is in effect. The following information applies only while the Auto-Deploy feature is switched off.
Local changes can be deployed while you are working in the Idea Studio. Click the button provided in the title bar of the studio:
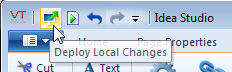
Deploy from the Idea Studio
A more powerful tool for deploying changes can be found in the Application Configuration dialog:
You can open this page as follows:
- Open the Application Configuration dialog.
- Click on "Deploy Changes" from the menu.
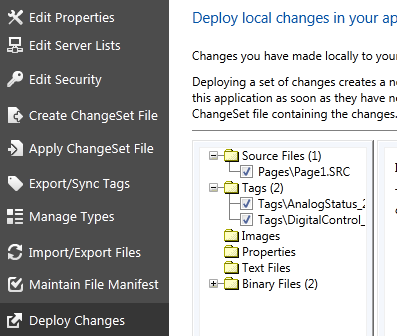
All changed files are listed
Use the Deploy Changes screen to see exactly what was done to each source file and tag. For example, clicking on the Analog Control tag (shown in the previous image) will open a display showing what was done to configure this tag:
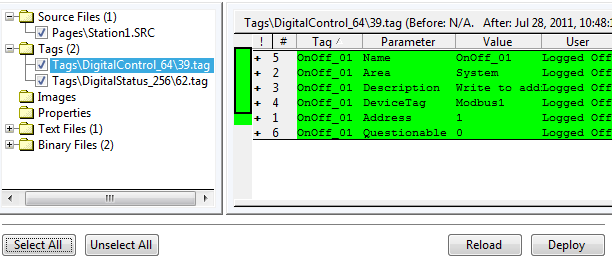
Every change to every parameter is shown
Changes made to source code such as a page, will show green lines for what is new, and yellow for the previous values. (Circled numbers link to descriptions in the following text.)
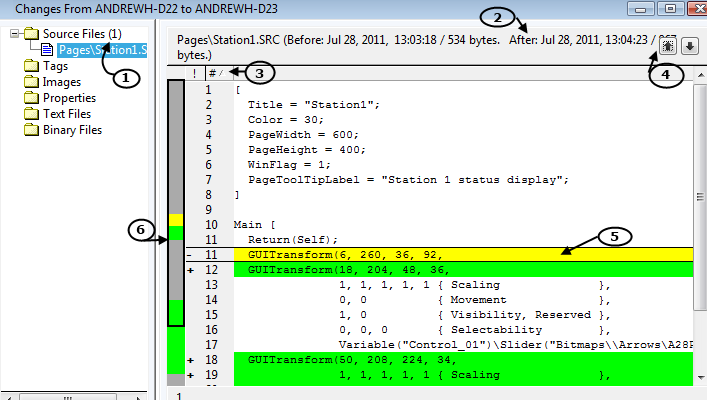
Numbers refer to the following list
The following tools are available to help you work with this display:
(1) The number of changed files in each category is shown in parentheses.
(2) Before and after time stamp and file size.
(3) Columns can be sorted by type of change (addition + or removal -), line number, alphabetic.
(4) Move Next and Move Previous changes the focus box (5) from one change to the next.
(6) Changes throughout the file are shown in color bars on the side panel. The black rectangle shows how much of the file is visible and can be dragged to show the next change.
When you first open the Deploy Changes page, all changed items will be selected. By selecting individual items in the list and using the buttons at the bottom of the page, you can choose which changed items will be included when you click the Deploy Changes button.

Available command buttons
The Reload button will refresh the display. If you have made local changes while the Deploy Changes page was open, click this button to ensure that all changes are displayed before deploying.
The Revert Changes page is disabled while the Automatically Deploy Changes feature is in effect. The following information applies only while the Auto-Deploy feature is switched off.
Local changes to an application (that is, those changes that have not yet been deployed) can be reverted or undone. If you need to undo local changes, use the Revert Changes page of the Application Configuration dialog.
You can open this page as follows:
- Open the Application Configuration dialog.
- Click on "Revert Changes" from the menu
You can revert all changes, returning to the last deployed stage of the application, or you can select particular changes to revert.
When you first open the Revert Changes page, all changed items will be selected. By selecting individual items in the list and using the buttons at the bottom of the page, you can choose which changed items will be included when you click the Revert button.
Development tasks often involve more than one file. Choosing to revert only some of the code changes required by a VTScada object may cause serious errors in your application.
The Reload button will refresh the display. If you have made local changes while the Revert Changes page was open, you should click this button to ensure that all changes are displayed before reverting.
Deployed changes are managed (and can be undone) using the Version Log.
