Assign Privileges
While you could add privileges directly to accounts, you are advised to add privileges to roles instead, then add roles to accounts. Used this way, roles define job descriptions. If you add a new custom privilege for a job description, you need only add it to a role to grant to everyone holding that role.
Privileges control what each user is allowed to do within VTScada. (System Privilege Reference for Developers) By default, all new accounts (other than the very first one) start with no privileges. A user who possesses the Manager privilege can choose what privileges to add (or grant) to each account.
Of the four roles that come with VTScada, three are intended as examples. You are advised to modify (or delete) these and to create your own roles. The process for creating new roles is identical to the process for creating new accounts.
The fourth role, Logged Off, belongs to VTScada and cannot be removed or renamed.
When managing privileges for a user or role, you can gain more space by minimizing the General, Password, and Advanced sections:
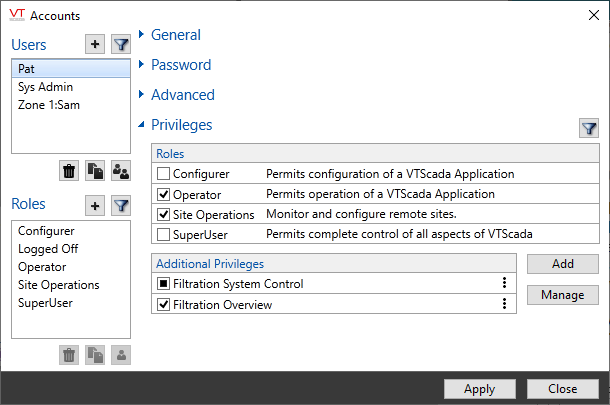
The Accounts dialog with General, Password, and Advanced sections minimized.
While VTScada comes with a large set of privileges, most of these protect only VTScada features.
Control Outputs is the exception, designed to protect all of your output tags from use when no-one is signed in. It is granted by default to the sample Operator role.
If you want to control which outputs are available to which operators, you must create custom privileges. See: Protect Pages and Output Tags.
Add versus Manage
Use either dialog to add privileges to an account or to a role. The difference is in the information presented.
- Add is the most straightforward, but least informative. It shows a list of only the privileges that the account or role does not have. Select those that you want to add.
- Manage also allows you to add privileges, but is far more informative after you know the symbols. All privileges are shown. Those that the account or role already has are marked according to how the privilege was assigned.
With the Manage dialog, you can remove privileges that were assigned directly, but not those granted by virtue of membership in a role.
You are advised to remove direct assignments of privileges that are also granted by role membership.
Custom privileges are discussed in Protect Pages and Output Tags.


The Manage Privileges dialog, as seen for an account that is
a Super User and also has the Thin Client Access privilege.
The following tools and symbols apply to the Manage dialog:
- A selected check box to the left of the privilege name indicates that the privilege is granted directly.
You can select and deselect privileges here. - A green check mark indicates that the privilege is granted, either directly or by virtue of role membership.
This is an indicator, not a control. - A people symbol indicates that the privilege is granted by virtue of role membership.
You cannot change this using the Manage dialog.
Recommended process for assigning privileges:
Preparation: Define the roles.
- Select each of the default roles in turn and click the Manage button to review the assigned privileges.
- Add or remove privileges in those roles as you see fit.
(Warning: think carefully before adding privileges to the Logged Off role.) - Optionally, change the names of the roles as you see fit.
(You cannot change the name of the Logged Off role.) - Create new roles, named for job descriptions at your site, where each role will require a different set of privileges.
A role should not encompass multiple job descriptions. You can assign several roles to an operator who does more than one job.
(See: Create Accounts and Roles) - For each new role in turn, use the Add dialog to assign privileges to that role.
- Review your work, carefully considering whether each role has the privileges it will require and no more.
Assign roles to accounts:
- Create an account for each operator and developer at your site.
(See: Create Accounts and Roles) - For each account, select the roles matching the jobs that person will perform.
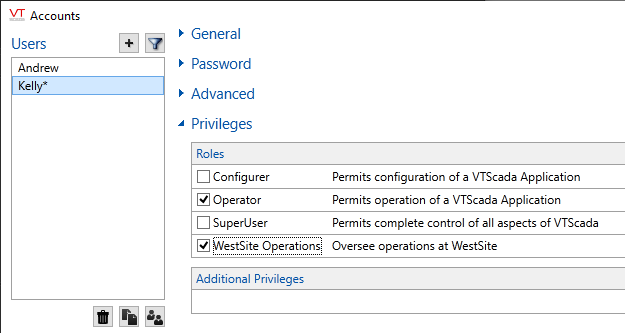
Assigning roles to an account.
For sites that use Windows Security Integration, the process is similar but performed by an IT administrator using Windows Active Directory groups to map user accounts to VTScada roles.
