
To display the value of a tag to an operator, or to allow operator control over a tag, you will use a widget. Widgets take many forms including color indicators, gauges, buttons, bars, switches, animations, text, meters, and more. In all cases where a widget is meant to represent or control a tag, there will be an option to link it to that tag.
There are widgets for tasks other than displaying or controlling tags, and these do not have a link option. Examples include Border, Grid and Folder. And if you are willing to spend time writing expression code, there are ways to display a tag's value other than using a widget. This chapter is concerned only with widgets for tags.
For a list of widgets included with VTScada, see the reference chapter: Widget Reference. Every widget topic includes instructions to help you find that widget in the palette. You can also create your own widgets. See: Create Widgets.
Palette entries are Menu Item Tags Create a folder for your most frequently used widgets and copy their menu entries there.
Because developers can draw widgets first, then link those widgets to tags, it is possible to leave unlinked widgets in a page. These will show simulated values.
To avoid the risk of simulated values being mistaken for real process data, the unlinked widget symbol can be drawn on all unlinked widgets. If you see this symbol, know that the values being displayed are coming from a simulator, not from equipment.
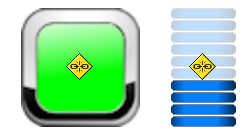
Unlinked widget indicator
Note: It is possible to display this warning only as a blinking indicator in the title bar. Developers with configuration privileges can click that symbol to toggle between having an indicator on every unlinked widget or having only a single indicator in the title bar.

Toggle display of unlinked indicators
Within the palette, widgets are grouped into folders according to their general appearance, purpose, and type of tag to which they can be linked. Many widgets can be found in several folders.
Many of the newer widgets can be linked to Style Settings Tags. This provides a single point of configuration where colors can be assigned to tag states (running, stopped, alarm, LCD component, etc.).
To add a widget to a page:
- Open the Idea Studio and open the page where the widget will be drawn.
- Open the Widgets palette.
- Click on the folders to view and find the widget you want.
Folders are organized by widget type, and by tag type. Navigate using the system that you prefer.
Use the navigation bar at the top of the folder list to return to a higher-level folder, including the "Home" folder.
- Drag a widget from the palette to your page.
Alternatively, click once on a widget to attach it to the cursor, then drop it on the page. - Adjust the size, location and other properties of the widget as required.
A format ribbon is available for each widget type.
Advanced configuration details can be accessed by opening the Properties dialog of the widget.
- Link the widget to a tag as follows:
- Select the widget.
- Click the Link button, either in the widget format toolbar or in the right-click context menu.
- From the tag browser (opened by the Link button) choose the tag this widget will represent and click Select.
- If the tag does not already exist, create it.
There are three ways to link a widget to a tag:
- Selecting the widget in the Idea Studio, then click the Link button in the Widget Properties ribbon
- Open the Properties dialog for the widget, then click the Tag Browser button found there.
- Use the Tag Links panel.
Widgets can also be linked to parameters, as is often done when using a parameterized page.
Draw from the Tag Browser
It is often easier to find a widget by drawing the tag from the Tag Browser. The Idea Studio will open (if not already open) and a filtered palette dialog will be provided, containing only those widgets that can be used with the type of tag you are drawing.
Preparation:
- Ensure that the page you want to draw the tag on is displayed.
- Open the Tag Browser and select a tag.
- Click the Draw button, or right-click on the tag and select Draw from the menu.
If the Idea Studio is not open, it will immediately open to the same page that you are viewing in the main window.
A dialog will open, showing the possible widgets that can be used to represent this type of tag.
- Navigate to the folder containing the widget you want to use, if it is not already open.
- Drag the widget you want to the page.
Alternatively, click once on the widget you want to draw - an instance will attach itself to the cursor. Click on the page where you want to place the widget.
The Tag Browser remains open, allowing you to draw the tag again using another widget, or to draw other tags. Close it when you have finished
Troubleshooting:
- The widget is too big / too small.
All widgets have an initial size, which may be wrong for your application. After the widget is placed, zoom in or out on the canvas until you can see the edges easily, then select the widget and drag the corner grips to resize it.
- The widget is cycling through values / colors all by itself.
Widgets display simulated values until they are linked to a tag.
- Unable to find a particular widget.
Look in the Widget Reference for the one that you want. Each description includes a list of folders where the widget can be found.
