Control Locks
Create Control Locks to prevent use and operation of selected equipment via the VTScada screens. Among other uses, locks are typically applied when technicians are physically working on dangerous equipment to prevent remote activation of that equipment.
If you are looking for a way to lock controls for some users but not others, you should apply a security privilege, not a control lock.
| Feature | Effect | Use... | Reference |
|---|---|---|---|
|
Security Privileges |
Control who is allowed to write to an output. |
Use in all applications |
Restrict Access to Output Tags |
| Control Locks |
Prevent use and operation of selected equipment via the VTScada screens. If the tag is protected by a privilege, users must also have that security privilege. |
Only where there is a need to lock controls for all users, regardless of privilege. | Control Locks |
| Control Tokens |
Ensure that only the current token owner can write to an output tag. Users must also have the required security privilege and the tag must not be locked. Only one user at a time can hold a Control Token. |
Only where there is a need to restrict control to one operator at a time. | Control Tokens |
VTScada Control Locks do not override physical switches or alternate controls for the PLC. They apply only to the VTScada user interface.
Control Locks are applied to tags. A locked tag cannot be operated by anyone (regardless of their security privilege) until the lock is removed. Locking a parent tag will automatically lock all of its child tags, making them inoperable as well. This allows you to prevent operation of an entire subsystem with a single lock.
Control Locks use features of the VTScada Alarm Manager. When working with Control Locks, you may note similarities, including the fact that active locks are shown in a customized view of an Alarm List widget.
Enable the Control Lock System
To use the Control Lock system in your application, the ControlLocksEnabled property must be set to 1. Disabling this property will not remove existing locks but will render all locks useless. (They will not prevent tag operation.)
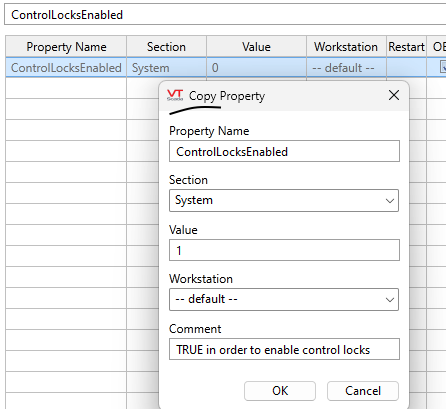
Detail from the Edit Properties tab of the Application Configuration dialog.
(Refer to Configuration Properties.)
Lock Management via Widget
Locks are added, removed, viewed, and managed using widgets that you draw. Do not look to the Tag Browser or tag properties for locks. Lock-related widgets can be found in the palette folder, Tools\Control Locks.
Add Locks
To create a lock on a tag (either a specific I/O tag or a parent of many I/O tags) draw an Add Lock Button Widget on a page of your choice and link it to an output tag or a parent of several output tags. To create a lock, users must have the security privilege, Lock Add / Remove. (Refer to Control Lock Security for further notes about security and locks.)
View / Remove Locks
To view and manage locks in your application, draw the Locks List Widget on a page of your choice. (The Locks List widget is in fact the Alarm List widget, configured to display Locks rather than alarms. The Alarm Page does not have this configuration option.)
To provide confirmation to operators that a tag is locked, draw either a Lock Level Icon or Lock Level Box on any page where that tag is shown, linking the icon or box to the tag for which you want confirmation. These widgets serve both to indicate when the tag is locked and the lock level applied.
The locks can be removed by clicking the Remove button in the Lock List widget.
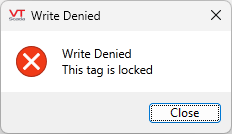
By default, all locks will prevent control of the tags they apply to. However, there are situations where you might want to use locks to inform the user of a situation but not prevent control. This behavior can be configured by setting a Lock Level and configuring the matching ControlLockLevelXPreventControl property (where X=1,2,3,…) to 0.
To inform the operator than a lock has been set (whether that lock prevents control or not), draw a Lock Level Icon Widget or Lock Level Box Widget on a page with the tag. If the Lock Level does not prevent control, no warnings are displayed; the icon or box widgets are the only indications that an information-only lock has been set. If the Lock Level prevents control, a warning message is displayed:
Like Alarm Priorities, the lower the number of a Lock Level, the higher its priority. Three lock levels are defined in every application and you can add more if required by adding new ControlLockLevelXPreventControl properties to your application, setting X to 4, 5, 6, etc. .
It is possible for any output tag to have more than one lock applied (for example, one on the tag itself, one on the parent equipment type, one on the parent station type, etc). In this situation, the enabled lock with the lowest Lock Level (highest priority) is the one that takes precedence and is shown by the tag's Lock Level Icon or Lock Level Box widget.
The highest priority (lowest number) lock takes precedence and dictates how the tag is locked. For example, a tag with a Level 1 lock that does not prevent control and a Level 2 lock that does prevent control will still be operable.
You can disable Control Locks on any tag structure by adding ControlLocksEnabled as a property of the parent Context tag (or user-defined tag) and setting that to 0. Locks will then not apply to any child tag within the hierarchy.
The opposite is not true: you cannot selectively enable Control Locks on tag hierarchies without enabling them for the application as a whole.
ControlLockAutoUnlockUponLogout
ControlLockCanOnlyRemoveOwnLock
ControlLockLevelXPreventControl
